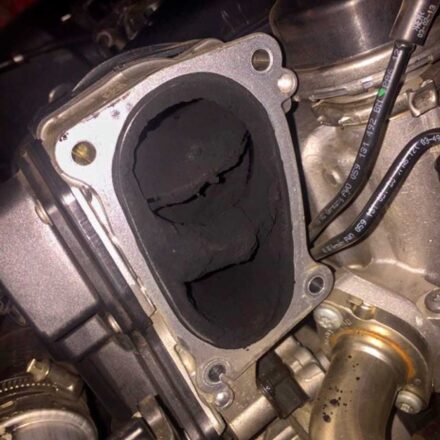
Have you ever thought about fitting a catch can to your 4wd? With all this talk about emission control processes, EGR, and carbon build up it’s hard not to ignore. As is can cause reduced performance and affect fuel efficiency. Visions of oil mist traveling to meet up with exhaust gases is not pretty. A party in your intake system from this will make a right royal sticky mess . Basically it will wake you up to the fact that when you try to fix one problem, another problem will often rear its ugly head.
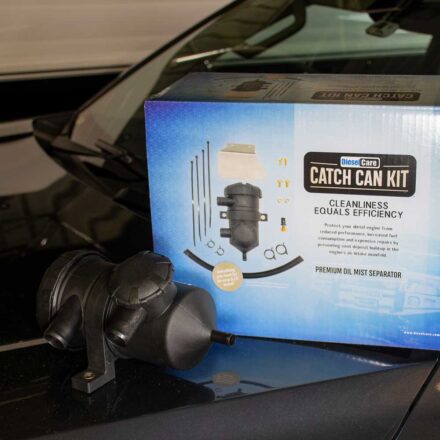
Luckily some bright spark came up with the solution to install a catch can. Also known as an oil mist separator. If you are a 4wd owner you’d be smart to consider adding one to your wish list. If you haven’t already. Here’s 8 simple steps explaining how easy the process is on how to fit a catch can.
Step 1: Choose the right catch can
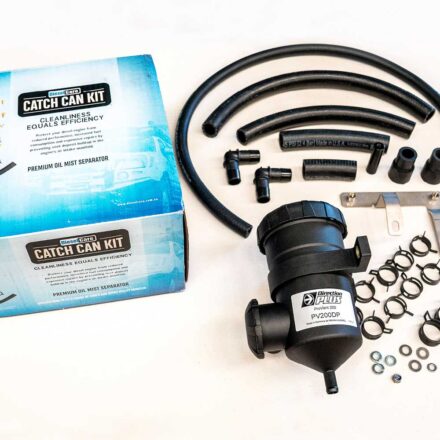
After researching catch cans you'll discover they're not created equal. Some Catch can contain filters made from steel or fabric, and some are just an empty can. Choosing the wrong type can cause further damage to your vehicle. The Mann & Hummell ProVent Oil Separator is one of the most premium catch cans available on the market today. Proven to effectively protect from carbon build up. Thankfully the team at Diesel Care Australia have produced a range of Premium D.I.Y. kits. The kits include the ProVent brand oil separator. They take the hassle of trying to piece it all together on your own. As fittings, hoses, instructions and brackets are all included. Installation is straightforward and replacement spare filter elements are readily available to purchase from numerous locations.
See the basics of what a ProVent Oil Separator is(Opens in a new browser tab)
Step 2: Mount the bracket
The beauty of a Diesel Care Catch Can Kit is that the custom designed mounting bracket included is high quality. They vary in size and shape to fit in the engine bay of your specific vehicle. Instructions are provided giving a clear indication of the bracket location. This allows you to easily secure it using the mounting bolts supplied.
Step 3: Prepare the ProVent
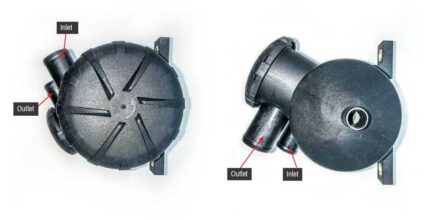
Preparing the ProVent firstly involves adjusting the inlet and outlet positions relative to the mounting band. If you’re lucky it will come out of the box already adjusted! If not, the band has a locking latch that can easily be released to allow the band to be turned. Positioning varies depending on the vehicle so that the vent hoses fit correctly in the engine bay.
Then, the drain hose needs to be installed to the bottom of the separator. A word of advice from the pro’s. Don’t leave it until the ProVent is mounted to the bracket. unless you want to add extra time to the job! Once the drain hose is in position, use a clamp supplied to hold it in place.
Step 4: Mount the ProVent
It’s always satisfying to see a new product installed and this is no exception. Plus it means you’re close to finishing up the job. To mount the ProVent oil separator to the bracket you just need to secure it with the bolts & nuts supplied. Just don't secure it too tight, in case slight adjustments are required. At the same time the drain hose needs to be routed so that it comes out underneath the engine bay. Put the hose in a position that can be reached to drain it.
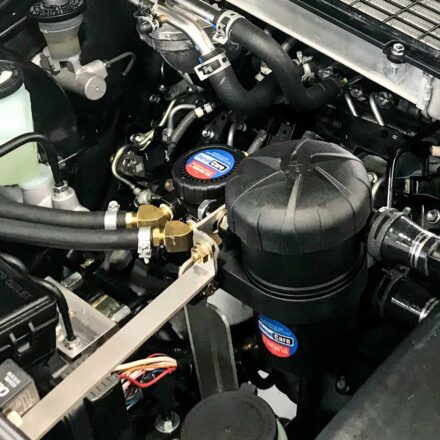
Step 5: Plumbing the vent hoses
Don’t be scared of this step, it can easily be changed if you get it wrong. You'll see both inlets and outlets are marked for assistance. If you read the instructions carefully and reference the detailed photos, you’ll have no problem. In basic terms you'll run the hoses from the ProVent inlet to the engine crankcase. And the ProVent outlet to the intake. In most instances the crankcase vent pipe will need to be removed to allow the hoses to be installed correctly.
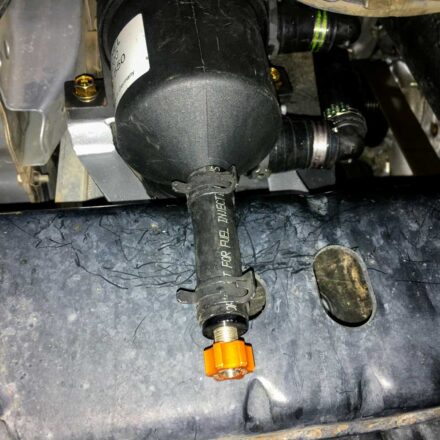
Step 6: Install the drain valve
Next it’s time to get under the vehicle to access the drain hose. Trim it to the required length before installing the valve used to drain the oil. Be warned, the valve is a tight fit. You might want to use some lubricant such as engine oil on the hose and valve tail. There are arrows on the knob indicating OPEN & CLOSED on the valve. Ensure it's closed, otherwise you'll see a nice oil stain on your driveway!
Step 7: Check your work
You’re pretty much done at this stage. But, make sure everything is clamped where indicated, bolts are secure, and hoses aren't rubbing against anything. There a few cable ties included in the box. Use them to secure any loose hose sections and you’re good to go.
Step 8: Maintenance
It’s always good practice to keep a record of the service maintenance schedule after fitting a catch can. So drain the ProVent regularly. The recommendation is to drain the oil every 5,000km or earlier.
Changing the actual filter element is dependent on the amount of blow-by. We recommend every 40,000kms for an engine in good condition or when oil wetting appears around ProVent by-pass valve.
You’ll find a service maintenance sticker in the box. Stick it on the windshield as a reminder of your next service date. See a demonstration on how to drain your catch can.
A final word…
From beginning to end the process takes about an hour and a half. The kits range between $345 – $465. Worth it when you consider the amount of carbon build up that can occur. As well as the cost of repairs from not installing one. Plus, you’ll get peace of mind that your critical engine components will be kept clean from carbon build up. And you’ll maintain engine performance and efficiency. See if we have a kit for your vehicle in our webstore. Our team is regularly developing new kits as the latest vehicles hit the market.
Get in touch with our specialist team with any questions on to how to fit a catch can. Call 1800 880 150 or visit our catch can overview page for more information.